
Data Platform 101: Change Data Capture
Understanding the concepts of change data capture by running an example in your machine

In the realm of databases, the traditional approach involves storing data points in tables and querying them as needed. While this method works, it struggles to meet the demands of today's data-driven world where real-time data processing is crucial.
Change Data Capture (CDC) offers a solution by capturing all data events (create, update, delete) as they happen and storing them in a history log format. This approach ensures immediate access to data, enabling businesses to perform real-time analysis, trigger actions, and maintain up-to-date data across systems.
Problems CDC solves
With AI and Data Science unlocking a new world where fast analysis of big data can generate previously unmatched business value, the immediate access to data became a survival necessity for data driven companies.
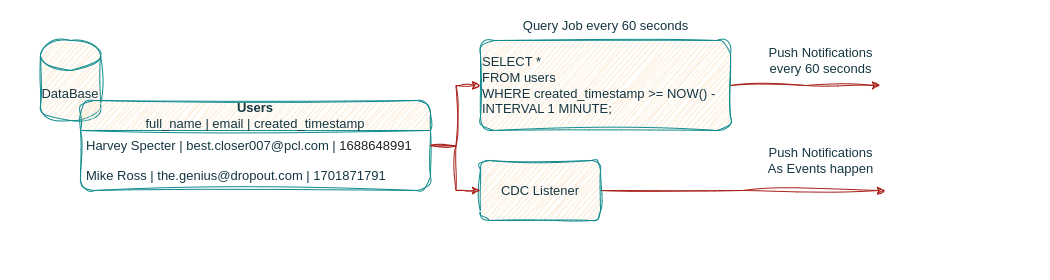
We can all remember signing up for a newsletter or creating an account in an application and immediately getting the welcome email or notification. But let’s think about this from a software perspective, how can their notification engine be so quick to send these messages as soon as you sign up.
Let’s picture two scenarios:
Periodically querying the users table and filtering for new users to then run the welcome notification algorithm
Continuously listen to changes as they happen in the database and trigger the welcome notification algorithm upon receipt of event
Many other problems can be solved by utilizing CDC within a business’ data infrastructure, the continuous capture of events as they are applied to the database can feed several downstream applications to serve real time analysis, predictions, trigger actions for user engagement and more!
How CDC Works
CDC refers to the process of identifying and capturing changes made to tables in a database and delivering those changes in real-time to downstream systems. This ensures that data in different components remains consistent and up-to-date without having to constantly reload entire datasets.
There are different methods to enable CDC on a database, to name a few:
Table Metadata: by adding additional columns to the table to represent timestamp or versions so we can capture data changes. Though this approach might have a patchy data flow as well as get more complicated as the database grows.
Database Triggers: setting up triggers in the database to log CREATE, UPDATE, DELETE events into an audit table can be effective, though it significantly adds to the computation overhead on the database and can be difficult to scale.
Log Based: This approach utilizes the built-in transaction log of the database (like MySQL binlogs) by listening to the entries in the log and processing them into table specific CDC events. This approach is the most adapted in modern industry as it proved to be highly performant with low impact on the database.
We will focus on the log based approach and build a working demo that allows us to visualize actual CDC events and better understand their behavior.
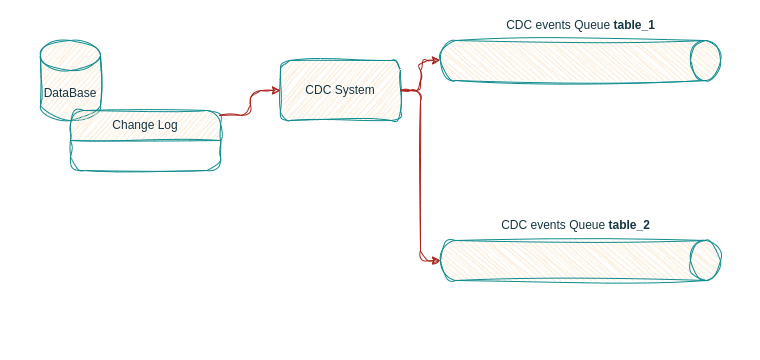
Understanding Log-Based CDC Flow
As the log based CDC engine keeps listening to our database’s transaction log, it will capture all data events (INSERT, UPDATE, DELETE), process them and forward them to their corresponding event flow.
In the diagram below we see how the CDC Listener is processing the database events:
INSERT statement become create events
UPDATE statements become update events
DELETE statements become delete events
The CDC listener forwards each event to its respective event flow, with one flow per table in the database.
Practical Example
After understanding CDC concepts and design, we will deploy a MySQL CDC Connector and observe CDC events in real-time.
Requirements
To run this example, you will need to have docker and docker compose installed in your local machine.
A few technical terms to keep in mind before we dive in:
Debezium: Captures and streams database changes for real-time data integration.
Flink: Processes large-scale data streams for low-latency analytics.
Flink CDC: Embedding CDC engines like Debezium into Flink for efficient real-time processing of CDC data.
MySQL: Relational database system used for managing structured data.
MySQL bin-logs: A transaction log in MySQL, enabling replication and recovery.
Data Stream: Continuous flow of data.
Kafka: Manages real-time data streams for building data pipelines and streaming applications.
Kafka Topic: A category or feed name to which records are stored and published in Kafka.
Reflect on MySQL to Doris Example
Before we dive in, let’s reflect on a real life use case of CDC data:
In the MySQL to Doris article, we dove into the analytical needs a business might need and how CDC streaming can unlock the potential of their data for them.
We can see in the MySQL to Doris example how data is being captured (using CDC events) and re-applied to the Doris data warehouse in real time.
For this article, we’re omitting the Doris component and capturing raw CDC events to dive into their characteristics and understand their behavior.
Prepare Environment
To start off, let's prepare our environment.
Setup Flink Cluster
Starting with getting a Flink cluster up and running
Step 1: Download and Install Flink
Using your machine’s command line, run these commands
# Download Flink
curl https://archive.apache.org/dist/flink/flink-1.18.0/flink-1.18.0-bin-scala_2.12.tgz -o flink-1.18.0-bin-scala_2.12.tgz
# unzip
tar -xvzf flink-1.18.0-bin-scala_2.12.tgz -C ./
# enter the Flink Folder
cd flink-1.18.0/
Step 2: Configure your Flink cluster
Edit the file conf/flink-conf.yaml using a file editor or IDE:
# Add the following line to enable Flink Checkpoints
execution.checkpointing.interval: 3000
# Edit the following line to allow enough task slots
taskmanager.numberOfTaskSlots: 4
Flink Checkpoints: Periodic snapshots for state recovery in Flink.
Flink Task Slots: Resource units in Flink for executing tasks.
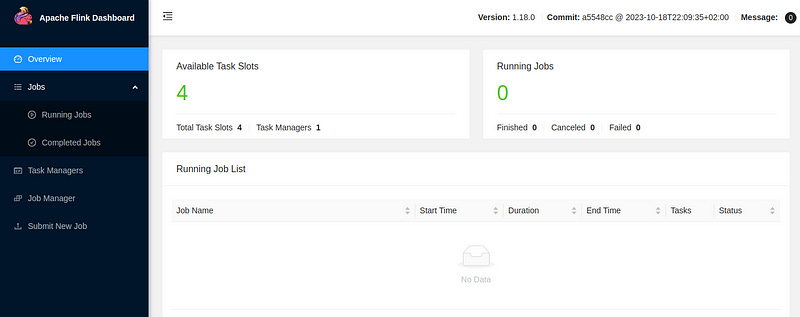
Step 3: Start the Flink Cluster
./bin/start-cluster.shOnce the cluster starts, you will be able to open the Flink UI in your browser using
http://localhost:8081/
and should see something like this:
Setup Dependencies
Next, let’s deploy our MySQL database and Kafka Cluster.
Step 1: Create the docker-compose File
Create docker-compose.yaml file with the following configuration:
version: '2.1'
services:
  mysql:
    image: debezium/example-mysql:1.1
    ports:
      - "3306:3306"
    environment:
      - MYSQL_ROOT_PASSWORD=123456
      - MYSQL_USER=mysqluser
      - MYSQL_PASSWORD=mysqlpw
  zookeeper:
    image: confluentinc/cp-zookeeper:latest
    environment:
      ZOOKEEPER_CLIENT_PORT: 2181
      ZOOKEEPER_TICK_TIME: 2000
    ports:
      - 2181:2181
  kafka:
    image: confluentinc/cp-kafka:latest
    depends_on:
      - zookeeper
    ports:
      - 9092:9092
      - 29092:29092
    environment:
      KAFKA_BROKER_ID: 1
      KAFKA_ZOOKEEPER_CONNECT: zookeeper:2181
      KAFKA_ADVERTISED_LISTENERS: PLAINTEXT://kafka:9092,PLAINTEXT_HOST://localhost:29092
      KAFKA_LISTENER_SECURITY_PROTOCOL_MAP: PLAINTEXT:PLAINTEXT,PLAINTEXT_HOST:PLAINTEXT
      KAFKA_INTER_BROKER_LISTENER_NAME: PLAINTEXT
      KAFKA_OFFSETS_TOPIC_REPLICATION_FACTOR: 1
Step 3: Deploy Your Environment
docker-compose up -dNote: Newer versions of Docker will use the syntax:
docker compose up -dSetup MySQL Data
With our environment all set, we can simulate some MySQL data
Step 1: Access the MySQL Database
docker-compose exec mysql mysql -uroot -p123456Step 2: Create MySQL Data
-- create database
CREATE DATABASE app_db;
USE app_db;

-- create users table
CREATE TABLE `users` (
`id` INT NOT NULL,
`full_name` VARCHAR(255) NOT NULL,
`email` VARCHAR(255) NOT NULL,
`created_timestamp` TIMESTAMP NOT NULL,
PRIMARY KEY (`id`)
);
-- create cases table
CREATE TABLE `cases` (
`id` INT NOT NULL,
`case_name` VARCHAR(255) NOT NULL,
`case_description` VARCHAR(255) NOT NULL,
PRIMARY KEY (`id`)
);

-- insert records
INSERT INTO `users` (`id`, `full_name`, `email`) VALUES (1, 'Mike Ross', 'the.genius@dropout.com');
INSERT INTO `users` (`id`, `full_name`, `email`) VALUES (2, 'Harvey Specter', 'best.closer007@pcl.com');
INSERT INTO `cases` (`id`, `case_name`, `case_description`) VALUES (1, 'Carvello vs. Karinski', 'Housing dispute');
Deploy MySQL-to-Kafka Connector
With everything in place, we can now deploy our data connector
Step 1: Install requirements
To deploy our connector we will first need a few packages:
Flink CDC: This dependency contains the secret sauce of deploying Flink jobs using a Yaml file
Flink CDC MySQL Connector: This dependency will allow Flink CDC job to connect to our MySQL Database
Flink CDC Kafka Connector: This dependency will allow Flink CDC job to connect to our Kafka cluster and publish data to it
MySQL Java Connector: This dependency is required for the Flink cluster to establish MySQL connections
# Inside the Flink cluster director ([...]/flink-1.18.0)
# Install Flink CDC
curl https://dlcdn.apache.org/flink/flink-cdc-3.1.0/flink-cdc-3.1.0-bin.tar.gz -o flink-cdc-3.1.0-bin.tar.gz
tar -xvzf flink-cdc-3.1.0-bin.tar.gz
# Install Flink CDC MySQL Connector
curl https://repo1.maven.org/maven2/org/apache/flink/flink-cdc-pipeline-connector-mysql/3.1.0/flink-cdc-pipeline-connector-mysql-3.1.0.jar -o flink-cdc-3.1.0/lib/flink-cdc-pipeline-connector-mysql-3.1.0.jar
# Install Flink CDC Kafka Connector
curl https://repo1.maven.org/maven2/org/apache/flink/flink-cdc-pipeline-connector-kafka/3.1.0/flink-cdc-pipeline-connector-kafka-3.1.0.jar -o flink-cdc-3.1.0/lib/flink-cdc-pipeline-connector-kafka-3.1.0.jar
# Install MySQL Java Connector
curl https://repo1.maven.org/maven2/mysql/mysql-connector-java/8.0.27/mysql-connector-java-8.0.27.jar -o lib/mysql-connector-java-8.0.27.jar
# Restart the Flink Cluster to load the new dependencies
./bin/stop-cluster.sh
./bin/start-cluster.sh
Step 2: Create the Job Configuration
Create the file mysql-to-kafka.yaml and insert into it:
source:
  type: mysql
  hostname: localhost
  port: 3306
  username: root
  password: 123456
  tables: app_db.\.*
  server-id: 5400-5404
  server-time-zone: UTC

sink:
  type: kafka
  name: Kafka Sink
  properties.bootstrap.servers: PLAINTEXT://localhost:29092

pipeline:
  name: MySQL to Kafka Pipeline
  parallelism: 2
Step 3: Run MySQL to Kafka Connector
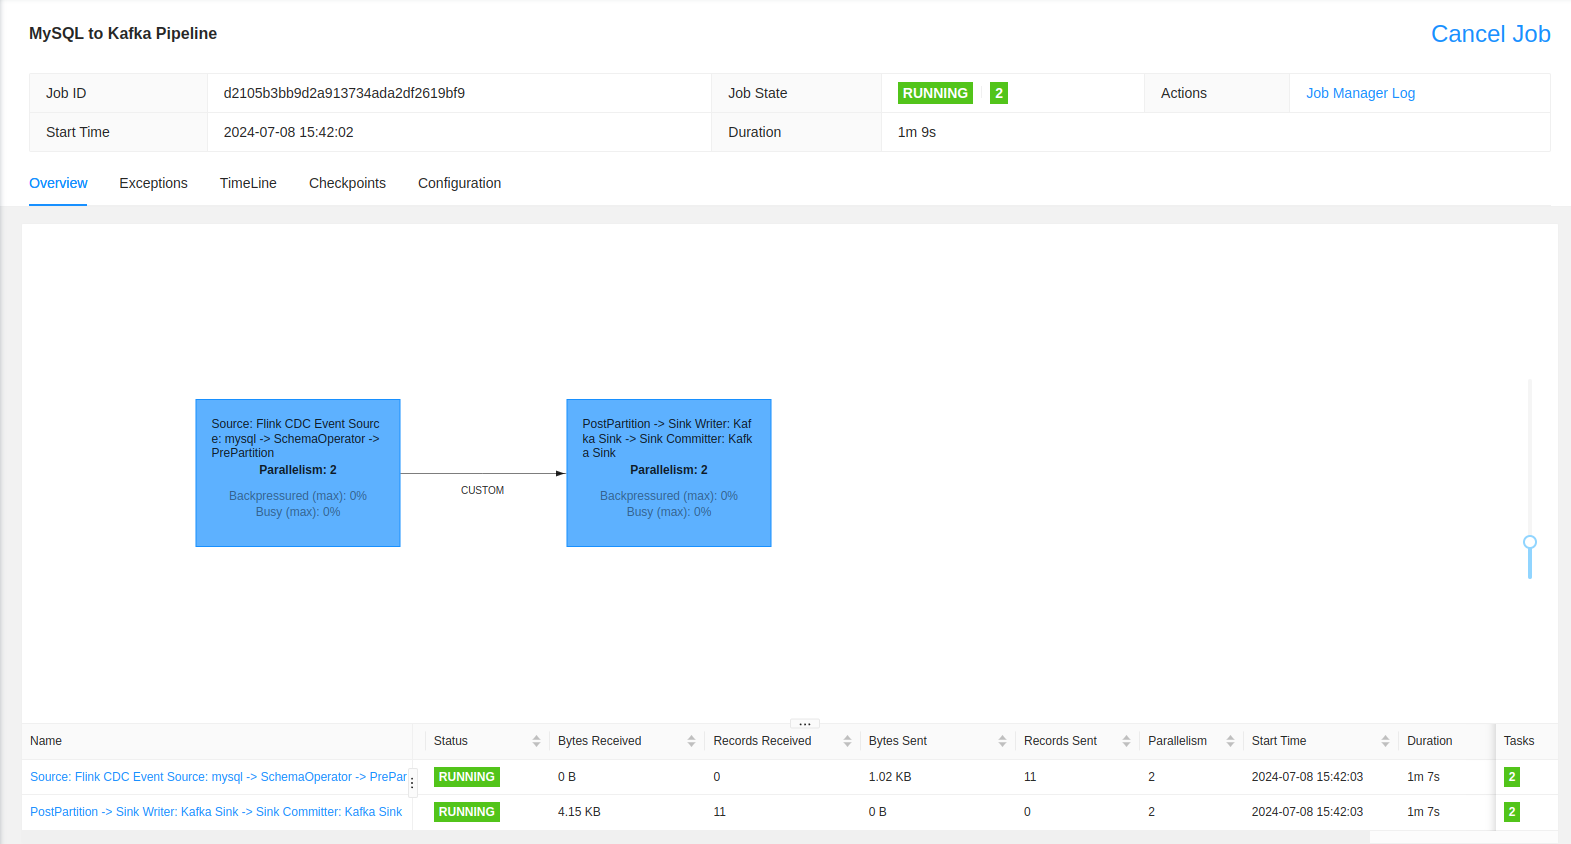
bash flink-cdc-3.1.0/bin/flink-cdc.sh mysql-to-kafka.yaml --flink-home './'Now we can go back to the FLink UI and observe our Job has kicked off and is processing the data.
Step Into Kafka
Next, we want to connect to our Kafka Cluster and observe the behavior of the data,
Step 1: Enter the Kafka Cluster Deployment
let’s start by accessing the Kafka cluster deployment by running the following command on your machine:
docker-compose exec kafka bashStep 2: List the Kafka Topics
After entering the Kafka Cluster, we can list all the topics available by running:
kafka-topics --list --bootstrap-server localhost:9092
# Output
app_db.cases
app_db.users
We can see that our Kafka Cluster contains 2 topics, one for each table we created.
Step 3: Fetch the Data from Kafka
Now let’s get our users from Kafka
kafka-console-consumer --bootstrap-server localhost:9092 --topic app_db.users --from-beginning
#Output
{"before":null,"after":{"id":1,"full_name":"Mike Ross","email":"the.genius@dropout.com","created_timestamp":"2024-07-08 16:07:14Z"},"op":"c"}
{"before":null,"after":{"id":2,"full_name":"Harvey Specter","email":"best.closer007@pcl.com","created_timestamp":"2024-07-08 16:07:14Z"},"op":"c"}
Understanding CDC Data
Alright, now that we have our setup ready, let’s get into the fun part! CDC data
first of all we need to understand the components of a CDC event:
before: the data before the operation, null if the data record in new, aka INSERT
after: the data after the operation, for UPDATE operations we can see the before and after versions of the record.
op: the type of the operation, as mentioned before, INSERT is c, UPDATE is u and DELETE is d.
Let’s keep our Kafka topic open in the terminal and get a second terminal where we will run some operations on MySQL and observe how they manifest as CDC events.
In a new Terminal, enter the MySQL cluster (command from previous steps) and run these queries:
# Update a record
UPDATE users SET email='m.ross@pcl.com' where id=1;
# We can observe in Kafka how we have the before version and the after version. We can also interpret from the u operation that this was a MySQL UPDATE query.

# Schema change
ALTER TABLE users ADD age INT;
# Observe that nothing happens on Kafka side as CDC only captures data events and not Schema events.

UPDATE users SET age=25 where id=1;
# Observe in Kafka how the age field was added and how it was null in the before section and 25 in the after section

# Delete a record
DELETE FROM users WHERE id=2;
# Observe the Delete event (as per the operation d) in Kafka, Here we have an unversed behavior to the Create event as the before section has the data that was deleted and the after is null.

# Insert multiple records
INSERT INTO `users` (`id`, `full_name`, `email`, `age`) VALUES (3, 'Harold Gunderson', 'rachel.fan@yahoo.com', 23), (4, 'Oliver Grady', 'research@gmail.com', 23);
# Observe the two new c events received in Kafka.

# Bulk Delete
DELETE FROM users;
# Observe in Kafka the four d events we get to indicate we erased all entries in the table.
Feel free to play around with the data more, create new tables and run more data operations. Observe how the CDC events manifest these operations!
Environment Cleanup
Don’t forget to cleanup your environment after completing the experiment
CTRL+c to close your Kafka listener
exit # Run this on both your Kafka terminal and your MySQL terminal

./bin/stop-cluster.sh
docker-compose downNext Steps
Now that you’ve established the basics of Change Data Capture, you should have more confidence in your journey to becoming a Data Platform Engineer, here are a few things you can look into to further progress in your journey:
Kafka: Understanding Kafka clusters, partitions and streaming types.
MySQL Replication: With the understanding of MySQL binlogs we established here, you should be well prepared to dive into MySQL replication and scalability.
Flink: Building your first Flink application should be much more accessible now that you know how to deploy a Flink cluster and run a Flink job.